Connect Menu

follow

Sunday, March 15, 2015

28 Weeks


Hello 3rd Trimester!! This is actually about half a week late but we've had a ton going on lately with some house warranty fixes so I didn't get around to posting when we hit 28 weeks last week. I really cannot believe there are less than 12 weeks left now in the pregnancy... it seems to be going by so fast now!

And yes this is our nursery paint color and I LOVE IT! More about that in another post. Oh and that's my arm/hand on the bottom of the bump.. not some weird lump :)


How far along: 28 weeks
Baby Size: an eggplant, almost 15 inches, ~2.5 lbs
Weight gain: +14
Maternity clothes: Yes but still rocking a few non-maternity dresses.
Sleep: Now getting up twice a night to pee.
Gender:
 BOY!
Movement: Yes, lots and lots of kicks and rolls.
Best moment this week: My first baby shower, it was a blast and munchkin is already so loved!
Looking forward to: Getting back into our home soon once the floors are done so I can start seriously working on the nursery!
Food cravings: None really.
Anything making you queasy or sick: The awful sugary glucose test drink.
Labor Signs: Nope
What I miss: Not having so many blood draws (and the awful glucose test).
Symptoms: Occasional back pain.
Nursery: Now that it is painted, it's ready for crown moulding.
Belly Button in or out? In but pretty shallow.
Wedding rings on or off? On
Mood: So grateful to have made it to the third trimester.


This was the week I found out I didn't pass the 1 hour glucose screening test and I had to go take the 3+ hour glucose tolerance test. It seems like torture to ask anyone let alone a pregnant girl to be fasting overnight, have blood drawn, drink a ridiculously sugary drink in 5 minutes that's more sugar than I would ever consume over multiple days, and then have blood drawn 3 more times at hour intervals while continuing to fast. At least I could drink water. The test made me feel terrible, thank goodness I passed it (with flying colors at that)! Apparently it is very common to not pass the 1 hour and do fine on the 3 hour... sounds like they may need a better screening test. My piece of advice is to everyone taking the 1 hour screening test is to not eat toast before the test. Do not eat toast even if your OB tells you it's perfectly fine to eat toast... I'm convinced I would have had no problem with the 1 hour if not for that toast! If you must eat something, have some nuts, eggs, or meat - things that do not have high glycemic indexes. It was quite irritating if you can't tell  but what's done is done... I'll never make that mistake again :)

Monday, March 9, 2015

Stork Diaper Bundle


I saw this idea on pinterest but the link only took me to an uploaded photo with no instructions or other details so I decided to figure it out on my own and then hopefully this post will help others that may stumble upon it. What would we do without pinterest?

 Stork Diaper Bundle


Materials

- receiving/swaddle blanket (this one is about 40 in by 40 in... made by serging around a piece of flannel)
- white cardstock and a color printer
- diapers - I used 24 size 1 pampers swaddlers
- yarn or twine or ribbon to tie diapers and stork

Find an image of a stork that you like. This is the one I used. I opened it up in the paint tool and used the eraser to erase the bundled part since I was creating the bundle out of diapers. It shortened his beak a little but it still looked completely fine since it starts to be black at that point anyway. Save the image. Print it out on white cardstock and then glue that piece of cardstock to the front of another piece so you have a double-thick piece of cardstock which will make your stork less flimsy. Using scissors, cut around the stork.

Roll up your diapers and secure the roll by tying yarn, twine or ribbon around it.

Fold your receiving blanket into thirds or fourths (hot dog style) depending on how big it is. You want it to be a little bit wider than the length of the rolled up diapers. Tie the ends in a double knot.

Place the rolled diapers into the tied up blanket. It helps to have two people for this so one person can hold the blanket up in shape so it doesn't collapse down as diapers are added by the other person. You can kind of fiddle with it to get the shape you want. Then tie your cardstock stork to the knot at the top again using yarn, twine or ribbon.

And your stork diaper bundle is complete! I liked putting it up on a cake stand for a nice centerpiece look.

I would also suggest not using newborn sized diapers so the new mom doesn't have to take it apart and undo the diapers right away if she doesn't want to. I think this is a great alternative to a diaper cake since it is less involved but is still a great decoration at a baby shower and useful to the new parents!


Get the full details from this Cute as a Button Shower.

Friday, March 6, 2015

A few organization projects


With some of the late gross winter weather we've had here, it motivated me to organize some things around the house.

First up... my fabric. I have some sewing projects coming up and keeping my fabric in bins and under bed storage containers made it difficult to remember what fabric I even had. We had this hutch in the attic that was in the family room area of our first home half finished. I had repainted the top half but never got around to the bottom half. So I slapped two coats of paint on the bottom to match the top (I wasn't really meticulous about it knowing it would be used as storage) and Eric cleared out the closet in my craft room. He took down the standard wire shelf to make room for the hutch and spackled over it.

Then I filled it up with fabric in the top part organized by type of fabric and by color family. It looks so colorful and it was fun to fold all my fabric and see some of the fabric I had completely forgotten I had - now hopefully that won't happen!

I filled the bottom cabinet section with my jewelry making supplies, beads, my paper cutter and my label maker. To the left of the hutch is bags of old clothes and such that I can use for projects like a pouf. To the right is my cutting mat and behind that are pillow forms and polyfill.


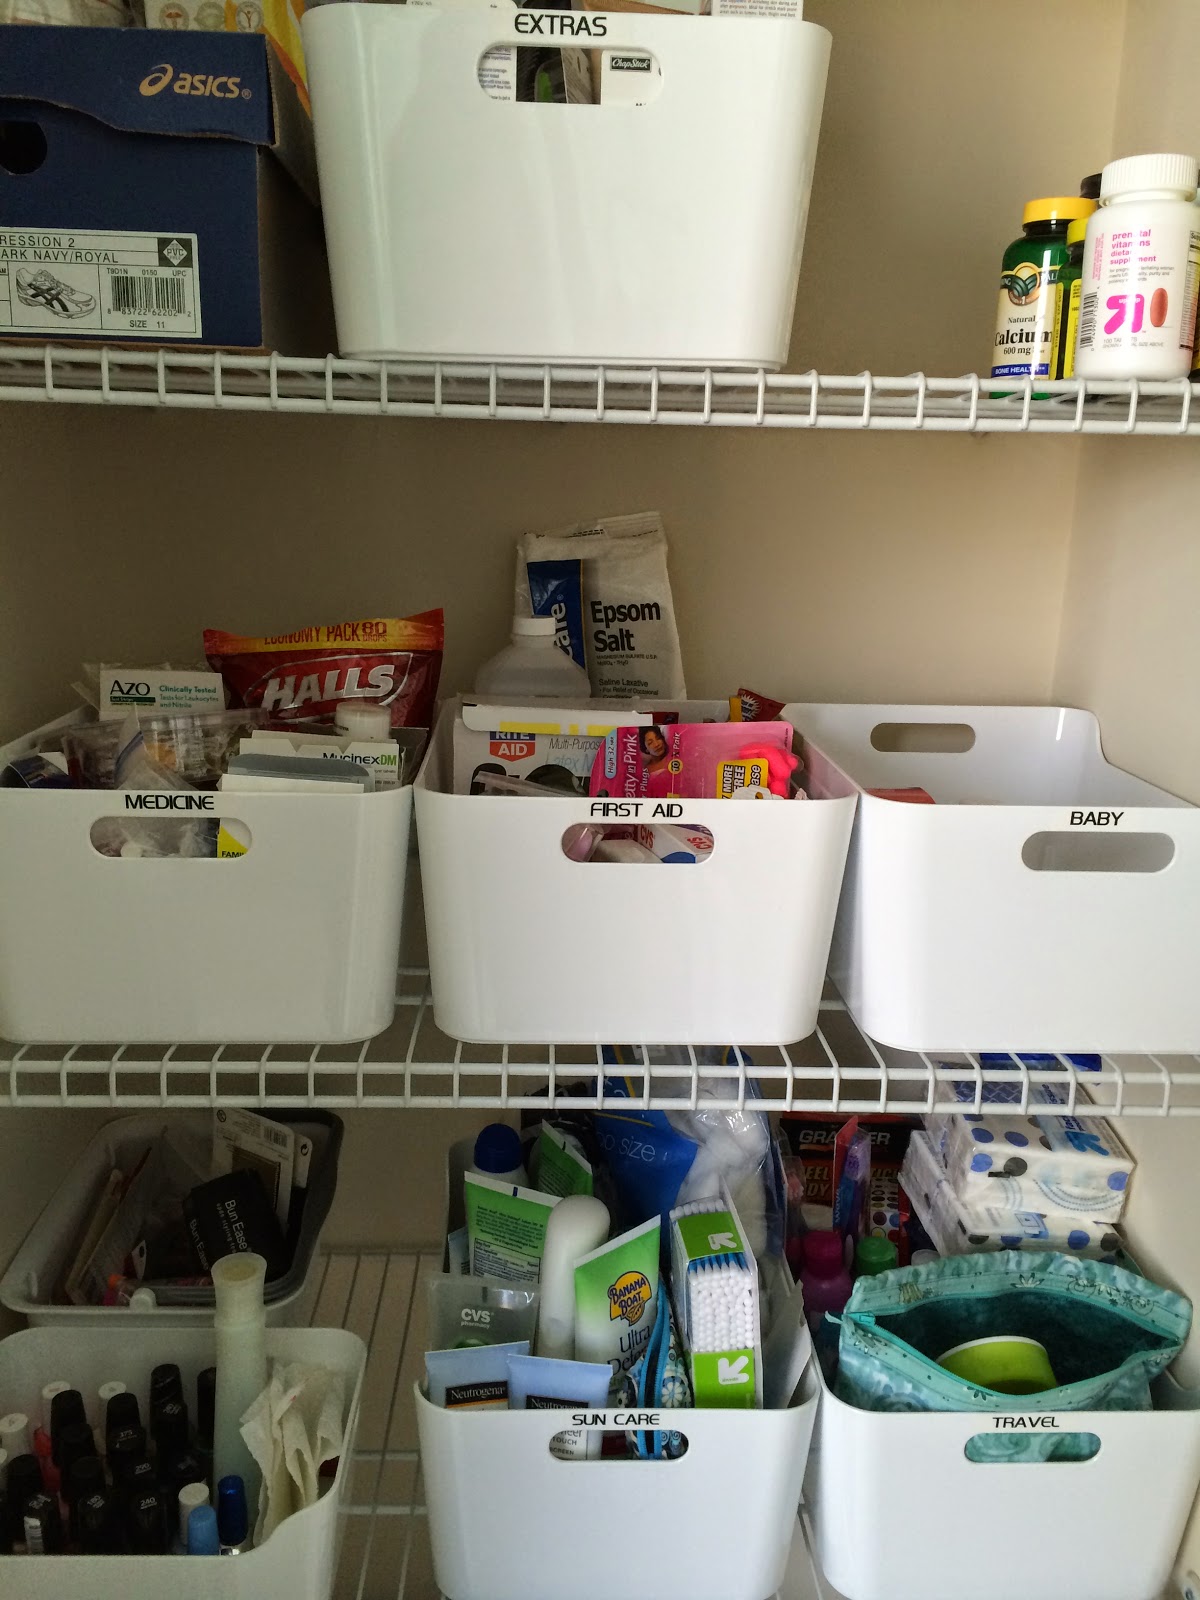
My label maker brings me to my next little organization project. I've had these white IKEA Variera plastic bins for awhile and threw things in our bathroom closet in them but finally decided to truly organize them. I started by cleaning out everything for expired items and then organizing them into groups that make sense for how we would use them.


This is how I organized and labeled the bins using my label maker:

Extras: extra toothpaste, toothbrush heads, lotion, razors and a few items that don't get used too often like hairspray. To the right of this box is extra vitamins so we never run out.
Medicines: cold remedies, allergy stuff, pain relief, etc.
First Aid: bandaids, rubbing alcohol, thermometers, gloves, ace bandages, etc.
Baby: this just has gauze in it right now but I'll fill it with baby-related stuff some of which I have registered for like thermometer, nasal aspirator, infant tylenol
Sun Care: sunscreens and aloe, plus q-tips and cotton balls since they fit nicely in there
Travel: all our travel bottles and travel sized tissues and other travel items like wrinkle spray, regular toothbrushes, travel toothpaste, seabands, etc.

The box next to the Extras has Eric's hair cutting stuff for if I need to give him a haircut and the netipot supplies are on top of it.

The area of the bottom shelf on the left side that has two unlabeled small containers are for nail care and hair stuff like my bun tools and extra hair ties. These are small and easy to see into so I didn't label them. The one with nail stuff is actually a smaller IKEA Variera box.

The top of the closet has sheets and towels for the downstairs and the bottom of the closet has a trash can (this is nice because this closet is opposite my sink area so I can put hair it in when I brush my hair in the mornings and less of it ends up on the floor) and our humidifier and extra tissue boxes. Our little portable heater gets stored in there too when it's not in use. There is still room for something else that might need storing like the humidifier we registered for for munchkin.


I'm really glad I took the time to organize this closet. This way if we need infant tylenol or some cough syrup quickly or in the middle of the night then we don't have to fumble around searching through everything in the closet.

Tuesday, March 3, 2015

Habitat ReStore Nightstand Redo


You may remember from this post, I have big plans to redo the master bedroom and finding new larger nightstands that better fit the room and the mixed look I wanted was one of the first steps in the redo. I found a small mirrored dresser at HomeGoods for my new nightstand and searched for awhile to find a companion for Eric that would be different but still complementary.

While in the Charlotte Habitat ReStore one day I found a small $180 dresser that was just the right size for a large nightstand and had character to it. I wish I knew more about the history of it other than it is from the 1920's... I love having an almost 100 year old piece of furniture! It honestly didn't look too bad as is but I wanted a painted piece for his nightstand.

Here is a before and after and then I'll walk you through the details of how I refinished it.


I removed the the piece of wood that stuck up on the back of the top and the pulls and sanded it.


I used wood filler for some spots with dings and also to fill in half of the pull holes because I wanted to go with knobs instead of pulls.


My dad was so nice to prime it at their house for me because being prego I didn't want to be around the fumes of primer. There are some old knobs my dad had in the pull holes so that paint doesn't get in there.


A week or so later, I painted it with two coats of Sherwin Williams no-VOC paint (so no fumes or bad stuff and I also wore a mask just to be extra cautious) in the color Alabaster. It's the same color I used on this Goodwill dresser a few years ago and I knew it was a nice white without being too bright of a white or being too cream-colored.


I actually did 3 coats of paint on the top and later a coat of a vinegar/water mixture as a sealer since Eric would be putting books and glasses and such on it frequently. I usually use polycryllic as a top coat but sometimes on white paint it can yellow even though it says it wont so I'm seeing how this natural vinegar/water mixture I read about lasts.


Then I ordered $10 crystal knobs off Amazon (my new nightstand from HomeGoods has crystal knobs so this would help tie the two together) and added them to the nightstand. I think they definitely look more expensive than they are.


Then it was moved into our master bedroom and I added the decor back to the top of it. I'll be honest, it usually has another book or two and a drink glass on top of it in everyday life. You may notice that the walls are a different color than from my last master bedroom post - more on that and hopefully a reveal of other room changes soon!


Related Posts Plugin for WordPress, Blogger...