Connect Menu

follow
Showing posts with label Organization. Show all posts

Friday, April 10, 2015

DIY Food and Drink Label Stands


I first made these food label stands for my sister in laws Duck Baby Shower. I wanted a way to label the different dishes and have those label be up high enough to easily see. All the stands I looked at online were kind of pricey so after some brainstorming with my mom, this is what I ended up with.


Materials

-wooden pieces that are flat on one side - mine were rounded but you could also use squares or another shape
-wooden dowels
-drill or someone willing to drill holes in the wood pieces for you
-cardstock, scrapbook paper or whatever paper you want your labels made out of
-scissors or punch
-marker or pen
-tape and glue
-twine for decoration (optional)

Drill a hole in the top of each of your wooden pieces or have someone do this for you. You may also be able to buy some with holes already in them. Make sure the hole is big enough to fit your dowel in and it doesn't need to go all the way through the wood piece (just most of the way) but if it does that's not a big deal.


Cut your dowels if necessary to the height you prefer. Mine are 12 inches but they can be a tad wobbly on a tablecloth and since I have big labels attached to the top so I think before I use them again I will shorten them by an inch or two.


Cut out labels or use a punch. I used a circle punch and a scallop punch so I could layer scrapbook paper behind the cardstock to make it more colorful. I cut a bunch of extra white scallops in case those are needed in the future. I glued a scallop cutout to a circle cutout and wrote the food item name on the white scallop. I tried to keep the names somewhat generic so they can be reused for multiple occasions and parties but whenever they cannot be reused, I have the extra white scallops on hand so I can glue a new one over the old one :)

You will need two labels for each stand so one covers the back and one covers the front. Attach the two labels to the dowel and to each other using little pieces of rolled scotch tape. I found this to be the best thing for attaching and wouldn't be too hard to remove an entire label from a dowel later should you need to. This is also when you can add twine or ribbon or some other decoration if you wish.


Then you can put your dowels with attached labels into your wood pieces and they are ready to be used! I have 12 of these on hand and they are great for showers, parties, and get togethers. They are great even for sometime simple like labeling which bowl of salsa is mild and which is medium or hot when you have guests over.


I reused the stands for my friend's Cute As A Button Baby Shower as well. These could also be place settings or have lots of other labeling purposes!


Monday, April 6, 2015

Nursery Closet Redo


After we painted the nursery aqua, my dad went to work on the closet. As you can see in the before photo, this closet is very narrow and having the hanging bar (or bars) at the back waste a lot of space.


My dad has put in a lot of closet shelving before (like some storage shelves he and Eric did at our last home - this has more detail about the shelving) and I really like the way the shelves don't use brackets which also get in the way and waste space. The shelves were already painted wood from Lowes and the wood pieces that brace the shelves were painted white by my dad to match. The shelves are about 15 inches apart.


The four shelves allow for so much storage and easy access. Plus there is space below the shelves to store things too. The rods on the very narrow wall on the right are able to accommodate baby and kids hangers with enough room but it would be a little too narrow for adult size hangers. They are 1 1/2 inch wood left natural and about 38 inches high (bottom rod) and 67 inches high (top rod). We could have painted these white too but that would have been more work and I think they look fine natural.


This layout definitely makes the best use of the narrow closet space when needed for hanging clothes and storing items. Definitely an awesome upgrade from wire shelves and rod! Thanks dad!

Friday, March 6, 2015

A few organization projects


With some of the late gross winter weather we've had here, it motivated me to organize some things around the house.

First up... my fabric. I have some sewing projects coming up and keeping my fabric in bins and under bed storage containers made it difficult to remember what fabric I even had. We had this hutch in the attic that was in the family room area of our first home half finished. I had repainted the top half but never got around to the bottom half. So I slapped two coats of paint on the bottom to match the top (I wasn't really meticulous about it knowing it would be used as storage) and Eric cleared out the closet in my craft room. He took down the standard wire shelf to make room for the hutch and spackled over it.

Then I filled it up with fabric in the top part organized by type of fabric and by color family. It looks so colorful and it was fun to fold all my fabric and see some of the fabric I had completely forgotten I had - now hopefully that won't happen!

I filled the bottom cabinet section with my jewelry making supplies, beads, my paper cutter and my label maker. To the left of the hutch is bags of old clothes and such that I can use for projects like a pouf. To the right is my cutting mat and behind that are pillow forms and polyfill.


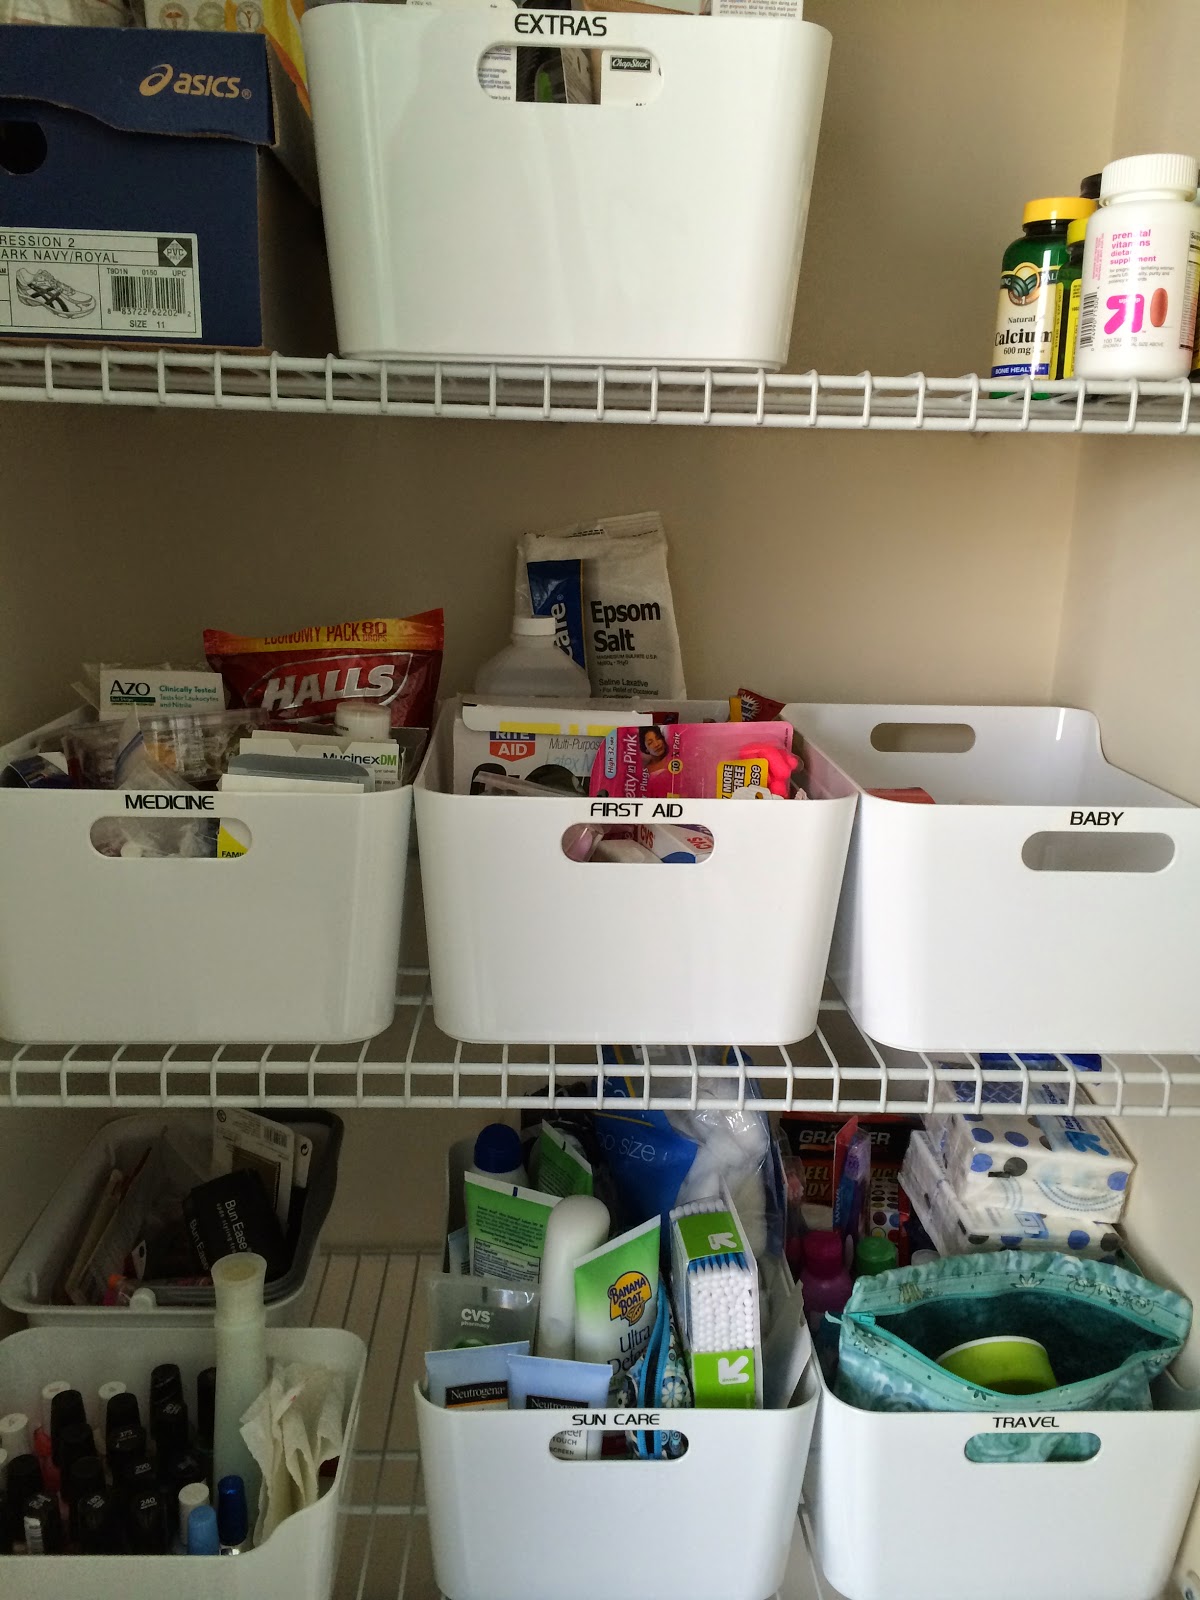
My label maker brings me to my next little organization project. I've had these white IKEA Variera plastic bins for awhile and threw things in our bathroom closet in them but finally decided to truly organize them. I started by cleaning out everything for expired items and then organizing them into groups that make sense for how we would use them.


This is how I organized and labeled the bins using my label maker:

Extras: extra toothpaste, toothbrush heads, lotion, razors and a few items that don't get used too often like hairspray. To the right of this box is extra vitamins so we never run out.
Medicines: cold remedies, allergy stuff, pain relief, etc.
First Aid: bandaids, rubbing alcohol, thermometers, gloves, ace bandages, etc.
Baby: this just has gauze in it right now but I'll fill it with baby-related stuff some of which I have registered for like thermometer, nasal aspirator, infant tylenol
Sun Care: sunscreens and aloe, plus q-tips and cotton balls since they fit nicely in there
Travel: all our travel bottles and travel sized tissues and other travel items like wrinkle spray, regular toothbrushes, travel toothpaste, seabands, etc.

The box next to the Extras has Eric's hair cutting stuff for if I need to give him a haircut and the netipot supplies are on top of it.

The area of the bottom shelf on the left side that has two unlabeled small containers are for nail care and hair stuff like my bun tools and extra hair ties. These are small and easy to see into so I didn't label them. The one with nail stuff is actually a smaller IKEA Variera box.

The top of the closet has sheets and towels for the downstairs and the bottom of the closet has a trash can (this is nice because this closet is opposite my sink area so I can put hair it in when I brush my hair in the mornings and less of it ends up on the floor) and our humidifier and extra tissue boxes. Our little portable heater gets stored in there too when it's not in use. There is still room for something else that might need storing like the humidifier we registered for for munchkin.


I'm really glad I took the time to organize this closet. This way if we need infant tylenol or some cough syrup quickly or in the middle of the night then we don't have to fumble around searching through everything in the closet.

Wednesday, January 29, 2014

New Birthday Toy


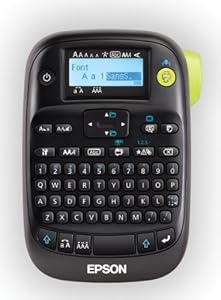
I talked about this fun little "toy" in my Gift Guide for Her post and have been wanting one for awhile. Luckily my mom pays close attention to my blog and got me this lovely label maker for my birthday today :) 


I cannot wait to use this thing and label everything... spice jars, bathroom organization, mail and paper organization, craft organization... so excited to label! Well maybe not everything... I'll try not to get too carried away. I guess it's a good thing we don't own a cat. Maybe Justin will bring Lily cat with him next time he visits...


No? Okay maybe not but these look just wonderful...
 
source
source


Funny thing is our niece asked for a label maker for her 6th birthday this past summer. We got her one that was a little easier for a kid to use but she loves it! I mean how many 6-year-olds do you know asking for label makers? Perhaps she gets that from me :)


Sunday, April 22, 2012

Closet redo with bracketless shelves

To the tune of Fresh Prince of Bel-Air  Now this is a story all about how my hubby and dad built closet shelves. And I'd like to take a minute, just sit right there. I'll tell you how I ended up with extra storage space.

Eric previously posted about our half bath transformation into a smaller half bath which allowed for making a new closet accessible from our living room and so he's baaaaack with a post about the closet!

Hi everyone, back with an addendum post to our bathroom/closet redo.  This is part two where I explain how we built shelves in the new closet.  Emily's Dad helped us out with these.  He likes to joke that we would be rich men if we worked by the hour.  While it's true that we worked at a snail's pace, I think it worked to our advantage and ensured we created some quality shelves.

Now Emily and I envisioned these shelves being a step up from your typical wire frame closet shelves that most home builders use.  We wanted some nice wooden shelves that had clean lines.  Emily's Dad had the good idea of building "bracket less" shelves.  This is the type of shelves they have in their kitchen pantry.  It has two benefits.  First, you don't see some ugly brackets sticking out from the bottom of the shelves.  Second more practical use is that it allows you to utilize the full space between shelves.


As you can see, we used some simple pine wood to build out the framing of the shelves.  We build the frames such that we could simply lay down the shelves on top of the framing with minimal fuss.  I bought some prefabricated shelves so they would look polished and clean.  They were of course not the right size for the closet, but it was just a simple matter of using the miter saw to chop them down to the right length.


The closet was big enough for four shelves, but as you can see we chose to only put in 3.  This gives us a very large space up top if we want to any tall items in this new closet. 

yes we like games

 The light from the bathroom redo came in handy here and really lights up the closet to make it easy to find things.

Thursday, April 7, 2011

Organized Linen Closet

I have recently gotten into the spring cleaning mode and decided to tackle a few areas of our house that had gotten a little cluttery (or a lot cluttery if you ask my husband).

1st up is the linen closet upstairs outside the guest room and bath. It's really much worse than the the picture even portrays.

BEFORE


This is the closet where we keep sheets, blankets, tablecloths, a pillow or 2, candles, and some gift items. It's always nice to keep a few gift items like picture frames, plates, etc. on hand since you just never know. Then some cleaning out, folding, organizing and such took place.....

AFTER


All the gift items went perfectly in the little basket. I have to admit that it didn't take very long to do and looks sososo much better. I should have done this ages ago but life tends to get in the way ya know!


In the near future I want to tackle the room we call the "junk room" which has been a catch all room for stuff... mainly some of my crafty things... oops! I hate to even show yall how much organization that one needs.


Linking up to these parties:

Monday, August 16, 2010

Organized Garage

A few weekends ago we organized/reorganized our garage. That sounds like a terribly exciting house project now doesn't it? Well when we moved in a little over a year ago we semi-organized stuff in the garage and it seemed fine. Little by little more things started accumulating in the garage like new tools, paint, furniture for projects and we nicely placed shoved stuff into whereever it would fit just so we could still get 2 cars in. And by get 2 cars in I mean nevermind the fact that you have to squeeze yourself in between some scrap wood, paint cans, and a nightstand to get to the car door. Don't even dream of climbing into the passenger door while its in the garage because the cornhole and pool floats are in the way.

We both knew it was time to organize the garage and do it right so that it would stay organized and we could actually find things. Especially once I bought the goodwill dresser and then we could only get 1 car in the garage... whoops!

Here is the before.. brace yourself:

How did we even find anything??!!

We, well Eric rather (I went out to a girls dinner hehe) went to Lowes to get organizey stuff.... peg board, a set of those hook things that go in peg board, wood, brackets, and one of those metal storage things made to hang from the ceiling. We took everything out of the garage and put it on the driveway to start with a clean slate.


Eric hung pegboard and shelves while I was on the driveway throwing out stuff and organizing things we wanted to keep and determining if any items should not be stored in the garage. At one point it did start to rain and we frantically rushed anything back onto the floor of the garage that we didn't want to get wet and everything else got a nice little shower.


A small problem we encountered was that the ceiling storage thing was not going to work in our garage. The box made it seems like you could hang it at a range of lengths but you really cannot... LIARS. The lengths we had to hang it at did not work out for where the studs were so no ceiling storage for now (until we find another brand) but we don't really need it at this point. I took some things such as a cooler, pool floats, cornhole into the house and put them in a closet under the stairs that we hadn't really been using. I think it's a better place for them. We put everything else back into the garage in organized fashion and put up a few ceiling hooks for the bike etc.

Here is the end result:


We realized we needed one more peg hook type thing for some bigger items like the rake, shovel etc. so we went back to Lowes and just screwed it into the pegboard where there was a wood slat behind. perfect.


It wasn't a glamourous house project like the deck (probably why we kept putting it off haha) but it's definitely more pleasant to drive in and out of a clean and organized garage :)  And it was less than $150 for the project, gotta love that!

Linking up here:

JAG Show and Share Day
Weekend Wrap Up Party
Making the World Cuter Mondays
Frugalicious Friday
Blue Cricket Design
Remodelaholics Anonymous
Sunday Showcase Party
Today's Creative BlogHooking up w/HoH
FrouFrouDecor
Related Posts Plugin for WordPress, Blogger...